Annie Sloan Chalk Paint: China Hutch Makeover
This post may contain affiliate links which won't change your price but will share some commission. Read more here.You don’t have to be a professional painter to learn how to chalk paint furniture! This china hutch makeover used Annie Sloan chalk paint and turned an outdated piece of furniture into a shabby chic beauty!
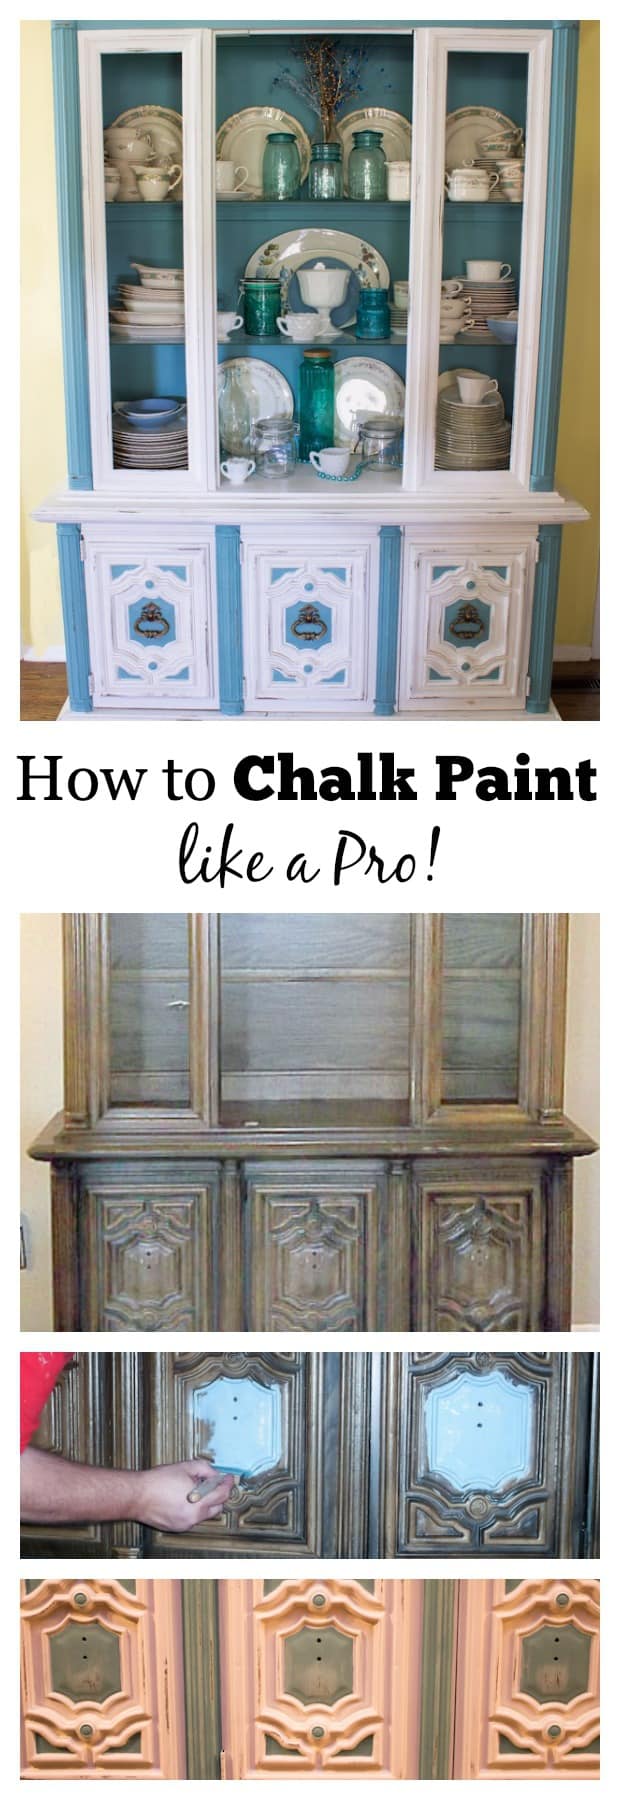
We now have a major love of chalk painting as seen in our mason jar chandelier, small kitchen buffet and this amazing china hutch makeover. (Since we’re more experienced in chalk painting you can read everything we’ve learned in 7 Chalk Painting Tips for Beginners.)
When my parents moved into a nursing home I became the recipient of my mom’s china hutch, circa 1970’s.
I remember the day it arrived at my childhood home so many years ago. My parents were not wealthy and barely scraped by most of the time. Yet my dad often found a way to buy the things my mom most desired. In the 1970’s that was a place to showcase her china and crystal, beautiful gifts from my parents’ wedding in 1945.
I can’t say I always wanted the hutch, but I knew one day I would inherit her china and crystal.
This bulky piece has been an eyesore in our kitchen. It was out of place and just didn’t fit. As I became addicted to Pinterest I started seeing chalk paint pieces that I loved and the search was on to find the right product and convince my husband to try it.
I started by telling him my ideas and sending him pictures of projects I liked. I knew the day he sent ME a picture that I had ensnared him in my sneaky plan!
He is a painter after all, but I was willing to try to do the painting myself. As we got closer and closer to actually purchasing the paint Tim began to take ownership of the project. Yes, I succeeded in my dastardly plot to get him to do the work after all!
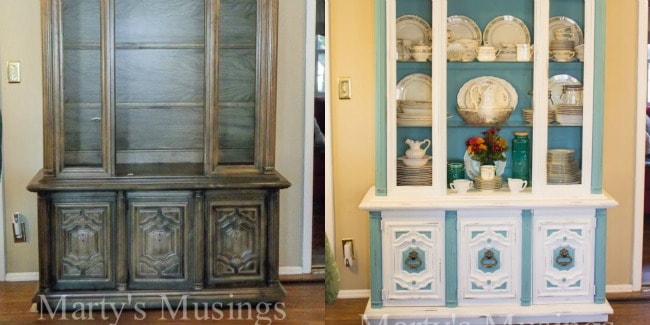
Here’s the china hutch in its original position in our kitchen, with glass and door intact.

Now moved to the opposite wall, destined to become the showpiece of the room.

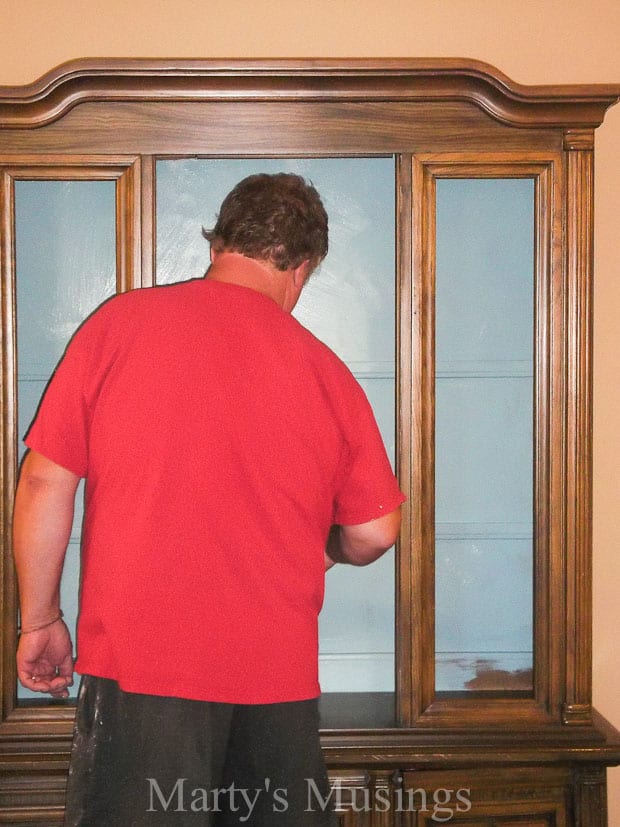
Door and windows now removed. The wood is that gross ’70’s kind of pecan walnut something. Very dark and scary…

Enjoy as my husband tells you all the details.
Annie Sloan Chalk Paint Tutorial
From Tim: OK – so this is where I take over the post…the hubby! This china hutch makeover was a “surprise” for my wife when she returned from a few days out with her friends.
The kids were gone, too, so I had the entire weekend to myself! THAT’s the look on my face! My house was SO quiet that I thought I was on the wrong side of the Rapture…left behind with chalk paint and an u-g-l-y hutch to transform. Yuck. But I digress.
Preparation
You must first know that working with Annie Sloan chalk paint goes against EVERYTHING I have learned in 22 years in the painting business.
The ladies at the business we bought the paint from, upon learning I was a contractor, told my wife that I was “NOT to make it perfect.” Strike one. All the instructions also said do not do perfect brush stroke applications, but criss-cross sloppy instead. Strike two.
The last straw was their recommendation to use a natural bristle brush with chalk paint. Problem? Absolutely! Natural bristle brushes are for use only with oil based paints, stains, and polyurethanes. One does NOT introduce these brushes to water, ever. Guess what? Chalk paint is water based, so you clean the brush with – say it with me – WATER! STEE-RIKE THREE!
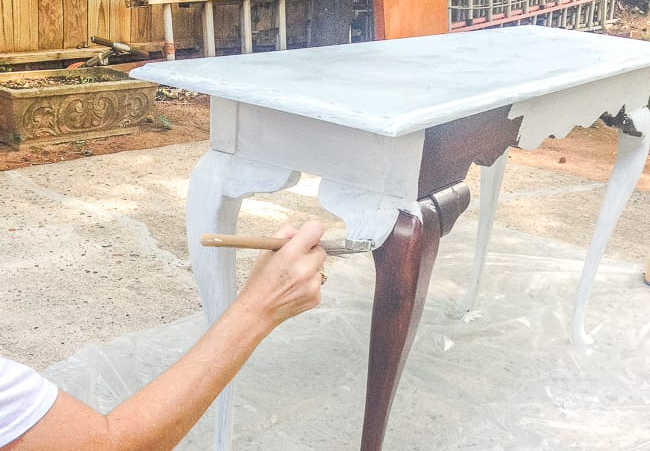
Painting
I totally bailed at this point, despite the chief’s my bride’s protestations. So, I began with the inside to avoid working on top of wet paint on the outside and dove into the blue. Not pretty, not straight lines, criss cross. Ugh…it’s gonna be a long weekend.

With the glare of the camera flash, you can pick up a little of the haphazard brush strokes. It really did make a difference when it came time for waxing; the variation in the surface enhanced the effect and would have been even more pronounced had I used the dark wax (we used clear).
While I knew I wanted the back blue, I had no idea what to do on the rest of the outside.
The piece had some beautifully intricate detail work, but I didn’t want to over-accentuate all of it and end up with a circus tent. I also knew that I could fix whatever became too garish with a re-coat of the other color. So, the best option was just to muddle forward and see what happened.

Beginning to take shape now, and will you look at those brush strokes! I’m still cringing. You can see that the doors have tremendous potential, but that is some pretty fine detail work and I kept thinking that it would be so easy to do too much on those. However, by the end, I would take advantage of most of that detail.

One of the unique features of Annie Sloan chalk paint(and all chalk paint in general) is that no priming is required. That was a VERY close strike four for me! I think one of the biggest deterrents to painting furniture that people have is that awful, smelly, messy, tedious step of an oil based primer before you really make progress.
With chalk paint, you jump right in and are transforming immediately. You are only limited by what you cannot imagine, and even at this point, I decided to go a bit further with the details.

Distressing
See! It really grows on you. This is almost finished, with two coats of each color everywhere.

You can also pick up some of the distressing that I did, but even that continues to this day. The scuffs are achieved by simply going after the surface with some heavy grit sandpaper (60 grit!). If you find you’ve done too much, just re-coat and start over. Your mistake may actually shine through a bit and add to the desired look.
Some of the videos suggest putting Vaseline on the areas where you are going to distress before you start painting. Because Vaseline is petroleum based, it does not react with water, thereby rejecting the water based paint. It, in theory, wipes right off.
Not for me – I knew had a 60 grit weapon in the wings! Plus, that sounded like far too much planning.

A few close-ups of the doors for detail and distressing. Until I painted the doors, I never paid any attention to the details. Well, honestly, I always averted my eyes away from the hutch every time I walked by, but that’s for another day.

There are big honkin’ handles that go back on that are the door knocker style, so it made sense to distress where they naturally hang. You also get a little better idea of the distressing.

Waxing
The cavalry has arrived! I enlisted helpers to apply the clear wax, since you really can’t do this part wrong. It is “wax on – wax off.” Just a light coat really draws out some of the brush strokes, the variations in the surface and the darker distressed spots.
A dark wax would make a huge difference, but I wasn’t bold enough to go there.

Trust me, it’s not THAT blue! But it does change with the amount of light that enters the room.
(From Marty: sorry about the color changes in photos. We shot at all different times of day and I had trouble editing the shots to all reflect the same color. But Tim is right, the color changes somewhat as you place other objects around it.)

And yes, by this point, I was quite ready to be done with the transformation.

Want to ruin a brush, even a synthetic bristle brush, in one easy step? Use it to apply wax! This was a great way to get into the harder areas, but there was no getting the wax completely out of the bristles, even with boiling water. It’s now my waxing brush – go figure.

Here is a final view of a finished door. See where the handle hangs right where I distressed? Your distressing, while random, should still make sense. Unless you’ve bounced the furniture down your front steps or thrown it off the moving truck, it probably isn’t scratched everywhere.
We’re still not sure about the color of the handles, but we need to live with it for a bit before making a change, if any.

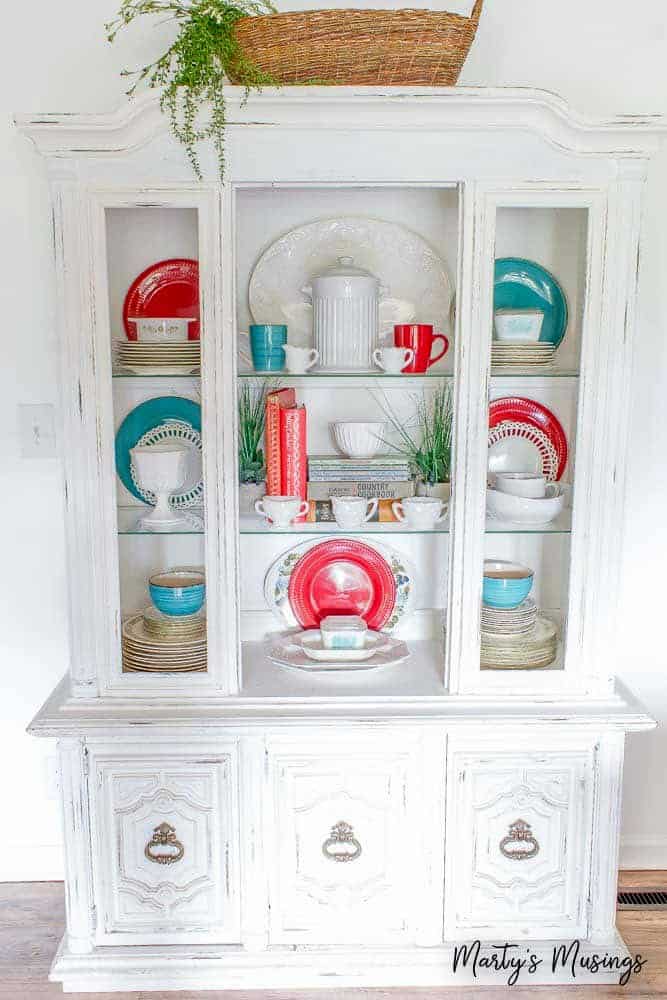
Less the handles, this is finished! Total time was about 5 hours, I think.
By the way, buying this brand of chalk paint is EXPENSIVE! At $40 a quart, a gallon would run $160! Strike five, six, seven, eight, and nine! That’s the inning. That’s the ballgame.
But it really transformed this behemoth into a conversation piece. FYI, we’re pretty sure the walls need to change to a pale yellow.
So, go for it! If I get advanced Rapture notice, I’ll race you to get more chalk paint! Not that I’m saying either one of us won’t be leaving…

From Marty: this post is just typical of our relationship. He’s the funny guy and I’m the sentimental one.
I set the mood with a nostalgic look at the china hutch makeover and he’s cracking jokes left and right and comparing the chalk paint to a baseball game! What can I say?
We’ve made it 25 years and I guess we have a few more good ones ahead (at least as long as he keeps tackling my projects like the scrapbook room remodel, the den makeover , mason jar chandelier and his amazing window table.)
**The paint used in this project is Annie Sloan chalk paint, Provence and Pure White, with clear wax applied over the top.
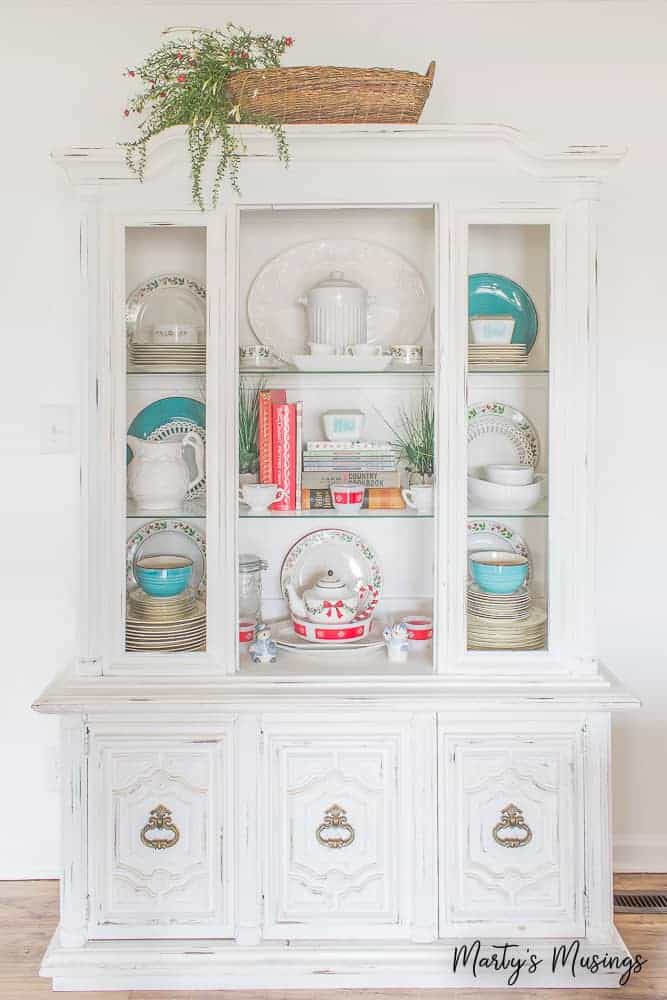
***Here you can see we’ve updated this piece with Pure White over the entire hutch. Love it!
More Chalk Paint Ideas
Practical painting tips for the home that anyone can use, including chalk painting, accent walls and choosing the right colors.

I just bought a vintage china cabinet through kijiji to refinish. I really like your tutorial. How smart to bring your hubby on board, he sound like my boyfriend who takes over my projects without being asked, but usually I end up glad that he does because he is way more precise than I am. He took over a wallpaper project that I am usually good at but I soon discovered that he is better. It makes my life easier. I am definitely going to use your site when I begin the project, will be happy to send pictures. Thank you again.
Hello! I am so excited to see this as I have my grandma’s ol hutch which is almost exactly like yours! I cant wait to try this on it, because I agree, its ugly!!
My question is how did you get the glass out?? I am a beginner, sorry if this is a silly question!! Thanks for any help!
Hi, Teresa. Thanks for your question. I’m not honestly sure but I think there is a way to ease it out so it’s not broken. Maybe google and see if you can figure it out? Sorry!
How much chalk paint was needed for a piece this size?
Hi, there. It’s been quite a while and this was our first project but I’m pretty sure it was less than two quarts. We used two different colors so we had two quarts. Later on we repainted the hutch one solid color so if you did that it would definitely take two quarts. Hope that helps!
wow this is really encouraging me with the china hutch that will be moving with us into our new to us home.
When your husband mentioned the price as another strike, i was curious to know if you have seen the DIY chalk paint ? the one with plaster of paris ?? i would be quite interested in what he would think about it. It is easily availale with a search. I must say i am just really enjoying your blog and how practicality and frugality can be incorporated into something with quite beautiful results. thank you for the assist.
Hi, Brenda. I have not tried the DIY chalk paint but I know some people have had great results with it. I would say try it on something small first, like a tray or home decor accessory and see how you like it. Or if you try a piece of furniture and don’t like the results you can always paint over it with a different brand. Good luck!
Great job. I have a very similar cabinet and I am planning on painting it. I think your handles (look like my cabinets) would look great painted white and distressed.
Love it! I so appreciate yalls humor too, its fun! May I also interest you both in a chalk paint that does not use wax to seal and no more buffing? AND its much less expensive than Annie Sloan to boot!!?? ShabbyPaints.com It is a chalk acrylic paint, NO VOCs, made here in good ‘ol USA. They have proprietary Vax and varnish,, also VOC free, in multiple colors, shimmer paints, shimmer glazes, in addition to a wide range of paint colors to choose from. Shabby paints brand also has gelato wood stain– again VOC free–AND everyone of their products can be mixed together for custom colors/finishes. Take a peek and give a try, you will fall even more in love with chalkpaint!! (Plus, wax breaks down requiring u to reappy every year or two…Shabby Paints Vax and Varnish lasts a miliion times longer. Even on outdoor items, vax/varnish last 7 years!! As aposed to one year with wax for best protection. 😉