Rice Krispies Treats® for Easter
This post may contain affiliate links which won't change your price but will share some commission. Read more here.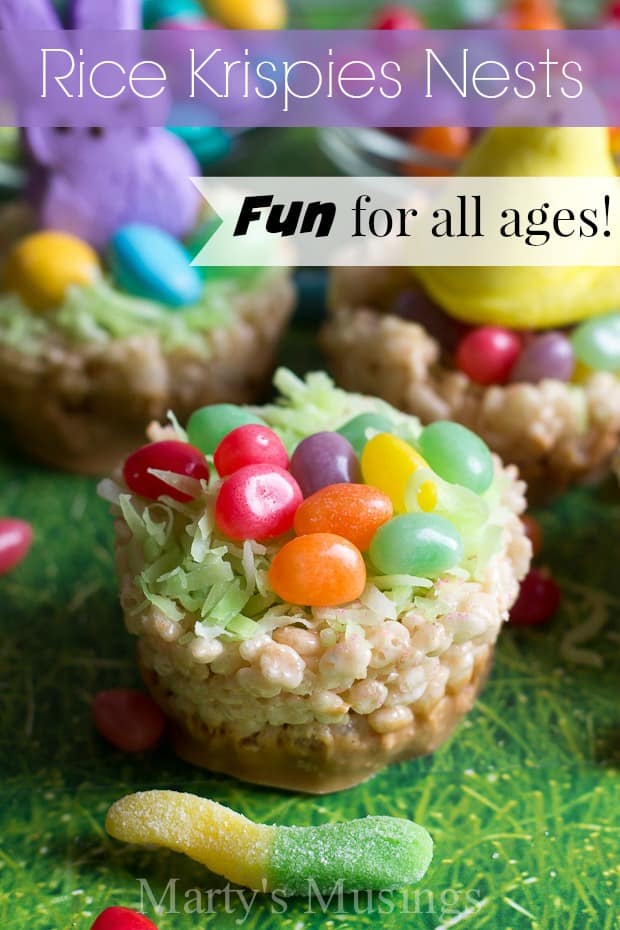
I am a seasoned mom and have lived to tell the tale.
Yes, after raising and homeschooling five children, I’m nearing the end of that season.
Endless days and sometimes even longer nights are now being replaced with eating bon bons by the pool.
Nah, not really, but it was such a sweet thought!
Anyway, one of the most challenging subjects was teaching my kids to bake and prepare meals.
Fractions were learned through measuring and pouring, mixing and baking.
As much as it tried my patience at times those teachable moments were filled with conversation and laughter.

One of my favorite memories of our long homeschool days was making treats for the holidays.
Halloween. Thanksgiving. Christmas. Easter.
Truth be told, I miss those days (not all of them, mind you, but many!)
Since I still have two teenagers at home I don’t want them to miss the memory making adventures in the kitchen rolling dough amidst raucous laughter and screams (mine, not theirs!)
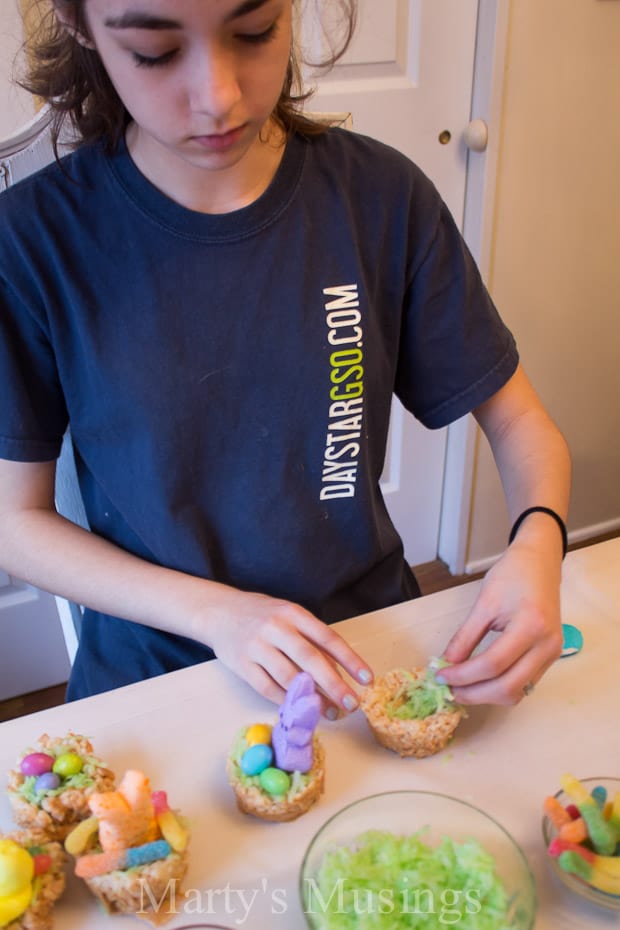
The joy of making Rice Krispies Treats® for Easter is setting your child’s imagination free, and I had no doubt my teenagers would love eating their creations!
Just provide a selection of toppings like I did (and there has to be some chocolate!) and let the fun begin.
This simple, 3-ingredient recipe is one every family should have on hand. I simply dolled it up a little bit by dipping the nests in melted peanut butter chips and letting my kids have fun with a few extras.
VERY IMPORTANT: Use butter and don’t substitute. My daughter made these treats a few times in the past, and we never knew why they didn’t quite stick together. BUTTER. Remember that!
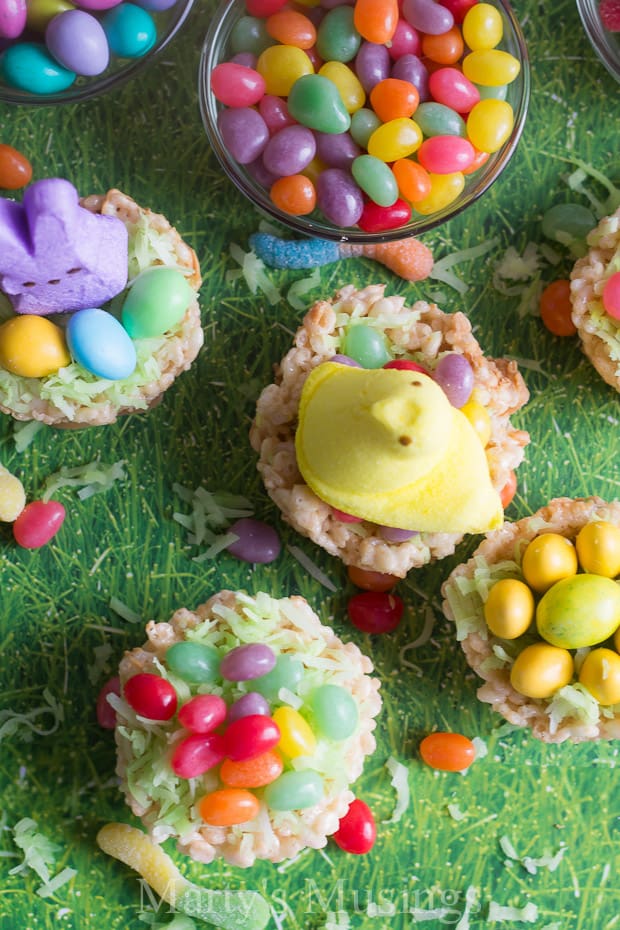
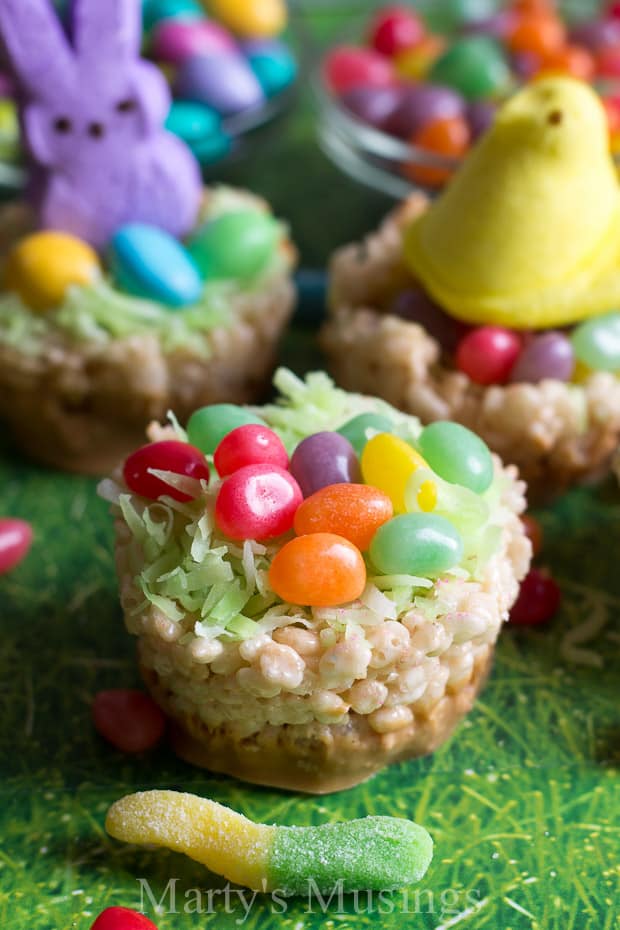
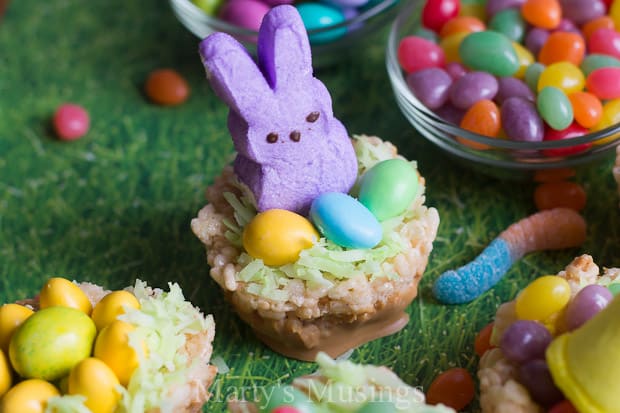
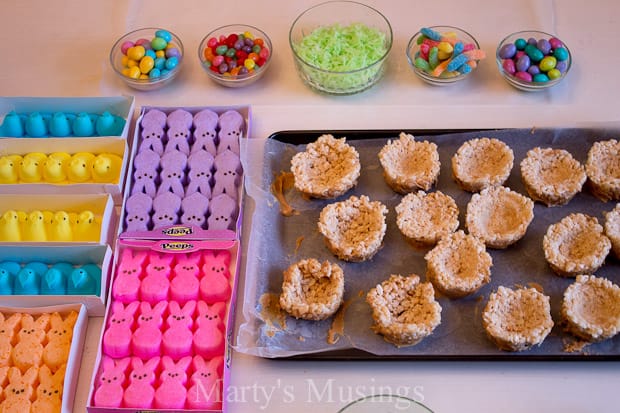
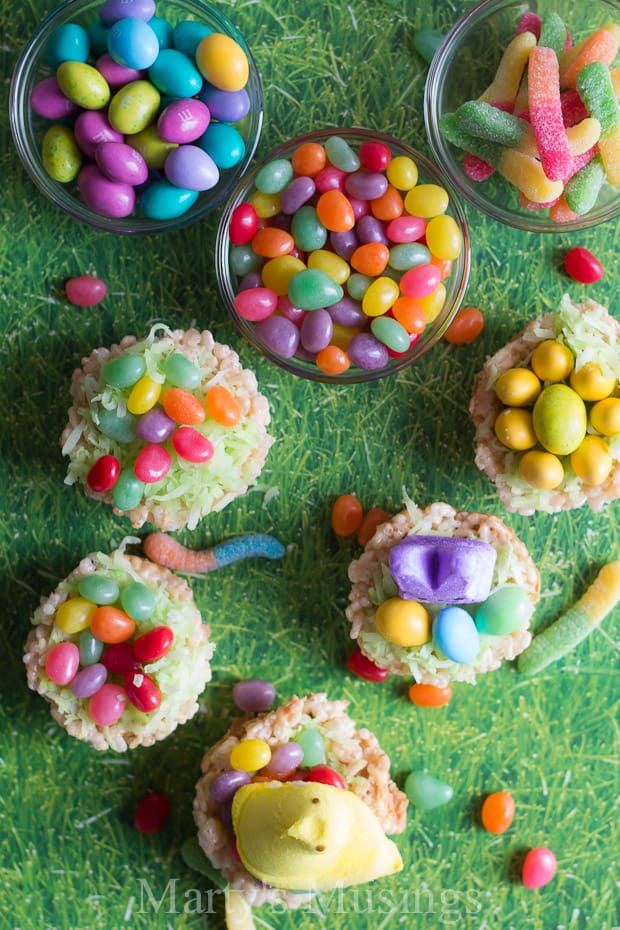
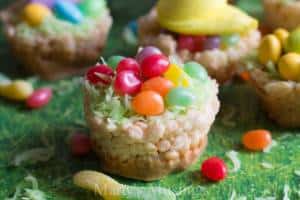
I used a muffin pan to shape the treats and dyed the coconut with green food coloring.
I also dipped the bottom half of the nests in melted peanut butter chips.
If you’re making these with younger kids I would suggest making the treats ahead of time (by yourself!) because once you get the ingredients mixed together you need to move quickly before the mixture hardens.
I knew my youngest son, our budding artist, would come up with something interesting. Teenage boys and all that silliness! (See if you can find the goofy face.)
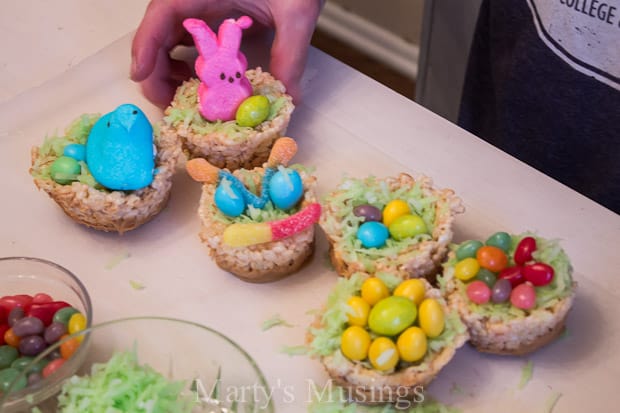
His sweet and patient sister definitely took her time and enjoyed the experience.
Sadly enough my husband, the biggest kid of us all, wasn’t able to help. Rice Krispies Treats® are his very favorite.
Once a kid, always a kid!
As a first time grandmother I’m excited for the years to come making memories in the kitchen with Nana!
For more Rice Krispies Treats® fun check out B-Inspired Mama
and Rice Krispies Treats® on Pinterest.
Rice Krispies® Nests for Easter
Ingredients
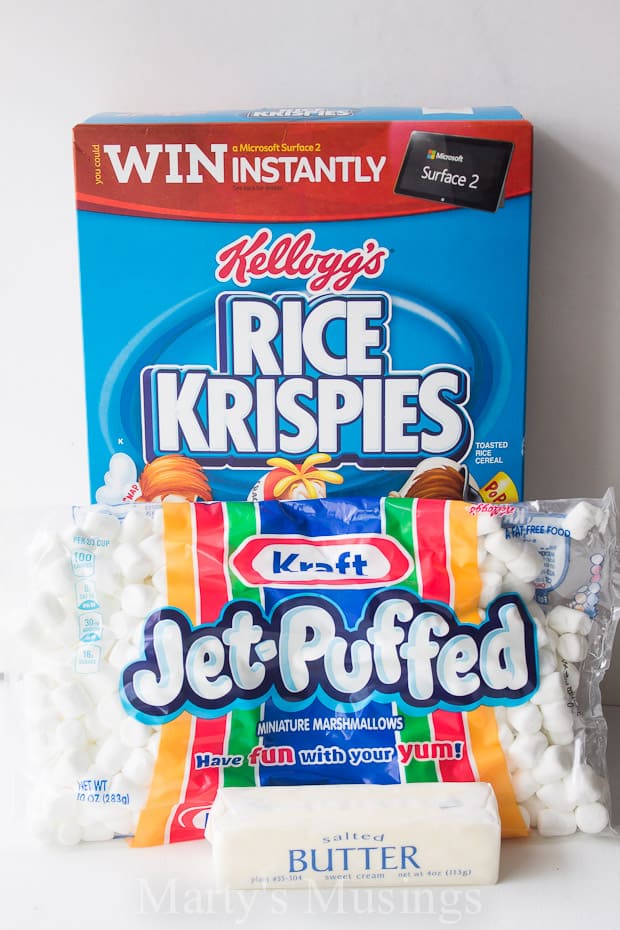
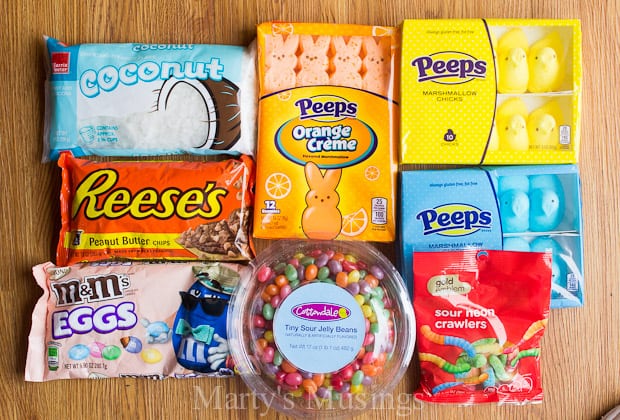
- 3 tbs butter no substitution
- 1 10- oz. pkg. Jet-Puffed Marshmallows OR
- 4 cups Jet-Puffed Miniature Marshmallows
- 6 cups KELLOGG'S RICE KRISPIES® CEREAL
- bag of peanut butter chips
- green food coloring
- bag of coconut
- jelly beans
- M&M's
- gummy worms
- other various candies
Instructions
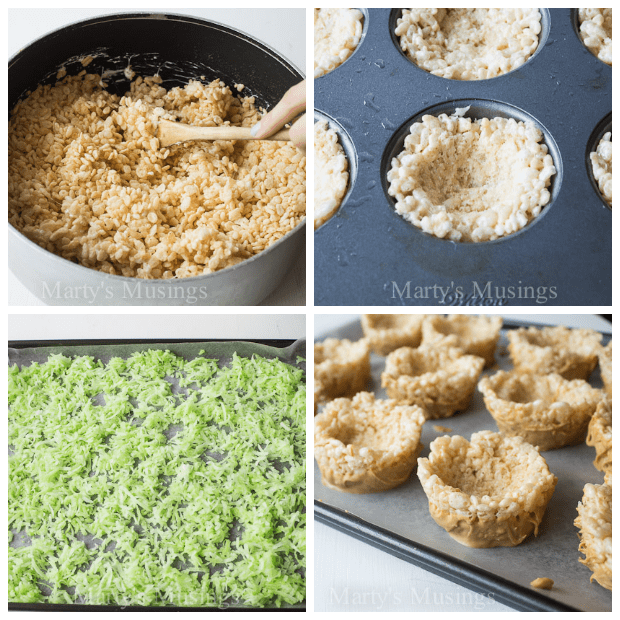
- Spray muffin tins with oil.
- In large saucepan melt butter over low heat.
- Add marshmallows and stir until completely melted.
- Remove from heat.
- Add KELLOGG'S RICE KRISPIES® CEREAL and stir until well coated.
- Press mixture evenly into muffin tins. If available, use greased mini tart shaper to mold into nest shape.
- Allow to set for a few minutes.
- Melt peanut butter chips in glass bowl in microwave for 30 second increments on low heat (1 cup at a time.) If necessary add a bit of oil for smoothness.
- Dip bottoms of nests in peanut butter chips and allow to dry on wax paper until set.
- Color coconut with 6 drops of green food coloring and 1/4 cup water. Let dry for several minutes.
- Your kids are now ready for decorating fun!
Notes
Only use butter, not a substitute.
If nest sticks to muffin cups use knife to pry under and lift out.
For best results use fresh marshmallows.
‘); // ]]>

My youngest who are 21 still like to do kitchen projects together. Sometimes I just sit at the table and chat while they make treats for us. Cute way ot makethe classic rice crispy treats for Easter.
It sounds like a wonderful way to spend time as a family! Thanks for sharing my post!
These were always my favourite treat as a kid, they look really yummy.
My husband loves them, too, Anita!
These are beautiful and tasty looking Marty. It is a wonderful thing to teach your children to cook.
Thanks, Deana. We did spend a lot of time in the kitchen because I wanted my kids to have those skills when they became adults. It was definitely messy but totally worth it!
What a wonderful cooking project to do with my daughter Sammy or our granddaughters!
We will definitely be trying this recipe for Easter!
Enjoy, Robin! They taste great and are so much fun!
My grandkiddos will certainly enjoy these! I am excited to make them as an Easter treat. Thanks, Marty.
Hi, Meegan. How can we be old enough to have grandkids? It’s definitely fun when they get old enough to enjoy cooking with nana!
These look amazing! We have some kids with a sweet tooth here at our house. We’re going to be trying these for sure, thank you for sharing them with us.
Have fun, Brooke! It’s a great family activity!
I love teaching my grand kids they are easy compared to my own kids! It gets easier! Love the cupcakes
I agree, Maria! Mine are still young but I hope to continue to teach them and cook with them in years to come. It gives my daughter a break!
Wow, these are almost too pretty to eat, Marty! Love how the recipes are easy (and fun!) for kids to make.
Thanks, Cat! My husband loves anything with Rice Krispies!
I admire you so for homeschooling Marty. I’m not sure I’d be able to manage and I only have two kids to worry about 😀 Plus I have no idea how to make tasty treats like these. My poor daughter had to jump in whenever we wanted something yummy. I’m sharing the recipe with her so she can add it to her growing repertoire of treats.
Homeschooling was certainly a journey, especially when we added three through adoption. There were many hard years where we just hung on and clung to Jesus. Thanks for sharing this recipe. It’s so fun!